Wednesday 6 February 2013

Make a Patterned Knick-knack Holder

This make is a useful one! Depending on the size of the pot you use and whether it has a lid, it can store all of those little bits and pieces kids use or collect. Larger yogurt pots are great for pens or paint brushes. Shorter pots can store crayons etc. Our pot had a lid, so I felt it would be ideal for Amelie's MANY hairclips.

Patterned Knick-knack Holder
Using bits and pieces found around the house, this make can spark the creative side in your child. Anything goes... the more colour and textures the better.

Time taken for us to make: 30 minutes

Original instructions


What we used: 
  • A clean yogurt with lid
  • Scraps of fabric
  • Ribbon 
  • Scissors
  • Glue 
Collect scraps to decorate pot


What we did: 
To begin we cut a piece of shiny gold fabric to size and glued it to the outside of the pot as a base. I then cut different shapes from felt and glitter paper and Amelie glued them in a pattern of her choosing. 

Cover the pot in glue 

Cover in material and add shapes cur from scraps

We finished by adding a decorative bow.


Amelie insisted that the knick-knack holder should be used as a garage for Lightening McQueen... we found somewhere else for the hairclips!

"It IS a garage for Lightening"


Lightening in his new home

Monday 4 February 2013

Make Cotton-reel Animals

This is a fun little activity especially if you have a child who loves imaginative play as these little characters can be played with as soon as they are fully dry. Amelie has played with our two cotton-reel animals many times, putting them in little imagined scenarios. The cat is 'hers' as she painted and decorated that one and he lives on her bedside table. I have custody of the mouse.

Cotton reel cat & mouse


Time taken for us to make it: 30 minutes.

Cost to me: Nothing - we found all materials in the house.

Original instructions


What we used: 

  • 2 x wooden cotton-reels 
  • Craft knife
  • Paints
  • Strong glue
  • Pencil
  • Stiff white card
  • 2 x pipe cleaners
  • Glitter pens

What we did: 
We took the stiff white card and drew round the end of a cotton reel twice, leaving enough room between the two to sketch the front and back body shapes. We chose to make a cat first.


Wooden cotton-reels are best for painting


Draw round the cotton-reel then the
front a back of the animal

Using the craft knife we then cut out the cat body shapes and painted them front and back. We also painted the cotton-reel the same colour. Once the paint was dry we added the feature details with glitter pens and attached pipe cleaner tails. 

Paint the body parts front and back along with the cotton reel

Add features

Once the features were dry we glued the front and back to the cotton-reel making sure the front and back feet were level so he stood straight. We then repeated the process to make a little blue mouse. When the glue is dry the playing can begin. 


Monday 21 January 2013

Make Snowflake Patterns

Inspired by the current weather conditions we have made paper snowflakes. This was perfect activity to occupy Amelie while we were waiting for Daddy to come home before going out to play in the snow.


You may remember making these as a kid! Super simple and all you need is paper and scissors. 

Time taken for us to make it: This 'make' took no time at all, but we did make quite a lot so it took about an hour. You can take as much or as little time as you like. 

Cost to me: Nothing 

Original instructions (square)
Original instructions (circle)


What we used: 
  • Thin white paper 
  • Scissors 
  • Small plate 
  • Pencil or pen

What we did: 

We began with cutting paper into a square. We then folded it in half, then quarters and finally diagonally. 

Cut out a square of paper 

Fold in half, then quarters

Finally fold diagonally 

I then drew loops and shapes onto the folded paper as a guide for Amelie to cut out. 

Draw shapes to be cut out

Cutting out the shapes was a little hard for Amelie's small hands. So she just did the simple triangle-like shapes as they only involved two straight cuts into the folded paper.

Once all the shapes were cut out, the paper could hen be opened to reveal the snowflake. (Amelie loved this bit). 


Using a saucer as a circular template we also made round snowflakes. Instead of starting by cutting a square of paper, we cut out a circle then used the same instructions. 

Using a saucer as a guide cut a circle of paper

Circular snowflake 

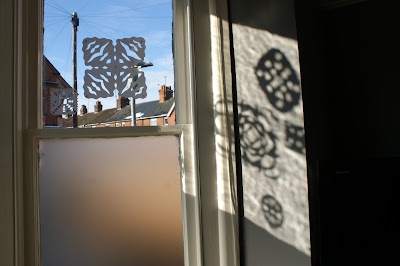
Using scraps of paper we made smaller snowflakes then displayed our collection in our lounge window. 

Stick the snowflakes to a window using bluetack


The paper snowflakes looked great on our windows and cast beautiful shadows in the afternoon sunshine a couple of days later. 


Make a Christmas Montage

Happy New Year you lovely readers x

Christmas is over, decorations are stored away for 11 months, places have been found for the many new toys that have come into the home... even the incredible amount of cheese has been devoured and the fridge shelves are looking a little more healthier. But what to do with all of the lovely Christmas cards loved ones have sent with season greetings? Well... here is a simple make that the kids will enjoy and makes use of what would have gone into the recycling bin.


Time taken for us to make: 15 minutes to cut out the pictures 10 minutes spent gluing and sticking.

Cost to me: Nothing

Original Instructions


What we used: 

  • Old Christmas cards
  • Scissors
  • Glue
  • Sheet of green A4 paper 

What we did: 
We cut out pictures from a collection Christmas cards that Amelie particularly liked.

Cut out the images
Then Amelie glued down the cut out images onto a sheet of green paper. 

Glue the images onto a piece of paper.


Amelie loves these gluing activities. We often use images from magazines, or (as a treat) we'll buy a pack of  stickers. She usually enjoys grouping images together by colour, size or type, eg: animals, flowers etc. It keeps Amelie entertained for ages which leaves me time to get on with things that need to be done around the house, or simply put my feet up for a while!