Thursday 30 August 2012

Forward Planning... Flower Pressing for 'Pressed-Flower Calendar'.

Today we made preparations for a 'Make' that we will be creating later in the year. To make a Pressed-Flower Calendar we need... pressed flowers!

We had to collect flowers now, while there is still a variety to choose from before the autumn sets in. If you don't have the time to do this within the next couple of weeks, you could collect a variety of leaves as they change to shades of red, orange, yellow and purple in the autumn.

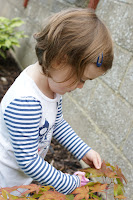
We collected some wild flowers on the way home from the shops. There are lots of wild flowers / pretty weeds to be found next to paths. Just a note - Do keep an eye on your child as they dash around picking flowers... a neighbour could get very angry if their prized Begonias are pinched!

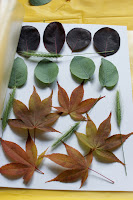
Our collection of flowers and leaves

After collecting our wild flowers, we ventured into our garden to carefully gather some leaves and blooms. 


You can buy a 'flower-press' from most craft stores or some toy or book shops. But we'll be using a pile of heavy books. To help keep the flowers in place as we transfer them to and from the bottom of the pile of books, I cut along the edges of a plastic wallet so it is only intact one side. You could use a magazine. I then placed a piece of paper in the wallet, upon which the flowers will be placed. We trimmed the stems of the flowers and then placed them facedown onto the paper.

Trimmed plastic wallet

Trimming the stems 


Flowers and leaves in place on paper 
 

When all of the flowers and leaves were in place, we added another sheet of paper on top and closed the plastic wallets. The wallets were then placed in the back cover of a large book and then heavy books were added on top. The pile of books are to be left for one week. We'll be leaving them until the flowers are needed as this will be the safest place for them.

Wallet placed in book
Heavy books were placed on top
We'll return to this in November or December when we'll be making the calendars as Christmas gifts.


Tuesday 21 August 2012

Make a Mask

This 'Make' can be as quick or as time consuming as you wish. Making a mask uses the simplest of materials as the foundation, then you can add as much details as you like using a variety of different textures. You and your child's imagination can go wild, creating characters who you can then become once you mask is complete AND dry - a soggy mask caked in paint & glue is not as calming as a facial!

Our masks... we also made one for Daddy!
Making masks can help children develop their hand-eye coordination, painting and drawing technique, etc as do most crafts, but what is really beautiful about making masks is what you do with them afterwards. Role Play and Imaginative Play is very beneficial to children. It is said that playing 'make believe' with growing minds will help them build social skills, confidence and a sense of self. It will also encourage language skills, leadership skills, problem solving and an understanding of other peoples perspective. Above all... it's FUN!

With Notting Hill Carnival coming up this weekend, this is also an opportunity to teach children about world events. Masks are used around the world to tell or remind people of stories. They are also used in parades during significant holidays. Maybe you have a local carnival or parade coming up near you.

Time taken for us to make: 90 mins (but we did make three). 

Cost to me: Nothing, we had all of the materials around the house.

Original Instructions
What we used: 
  • Paper Plate 
  • Scissors 
  • String
  • Pencil 
  • Plastacine 
  • Paint & Glitter Glue Pen
  • Glue 
  • Coloured Paper 
  • Feathers 
  • String 
  • Scraps of felt 
Getting ready to start
What we did: 
First we drew faces on a the underside of the paper plates using a pencil. We then cut out the eyes and mouth. 
Draw a face on your plate
Cut out the eyes and mouth


We made small holes in each side of the mask using a pencil with a ball of plastacine underneath the plate to ease the pencil through safely (a classic Blue Peter tip). The holes are needed to tie the lengths of string through each, which will fasten around your head. Amelie was VERY excited to use her String-Holder Cat that we had made previously. 
With care make two holes on either side of the mask 

Amelie used her String-Holder Cat
Tie the string to your mask 

We then decorated the masks. Amelie chose to make a cat using felt and feathers for the ears, felt pen to colour the nose & glitter glue for the whiskers. She also added sequins for extra glamour!
I chose to go down the carnival route with a bright sun face. I used paint for the face and glitter glue for the features. Feathers were glued around the edge for the rays.
My second mask was a lion. I swirled the paintbrush to give the texture of fur then added a felt nose & glitter glue for the features (Have you noticed a theme here?... We do LOVE glitter glue pens). To create a full mane I tore orange and yellow paper into strips then wrapped them around a pen to make curls, then glued them around the edge.

Decorate your mask

Amelie's Cat Mask 
My Carnival Sun Mask 

My Lion Mask 


Swirly brush strokes to create texture
Amelie couldn't wait to show her Dad our masks. She was excited to tell him which mask he was to wear as he got through the door, home from work. We took turns trying each of them on whilst dinner was cooking. 

We'd love to see what creatures you create. You can send pictures to us via Facebook or Twitter

Thursday 16 August 2012

Something I Found...

Since starting this blog (only a couple of weeks ago!) I have been introduced to so many fantastic Websites, Facebook Pages, Twitter Accounts, Pinterest Boards and Blogs besides my own. I am giddy with beautiful photography, tips & recipes.

One particular website really stood out... The Simple Things. This site seems to embrace everything that I do. There is an abundance of gorgeous little articles that encourages people to stop and smell the roses, spend time with friends and family, home cooked food, make the most of what you have and make your life richer with no real financial cost - For example; long muddy walks don't cost a penny, but they are SO satisfying!


I figured that if you are reading my blog, you'd enjoy taking a look at The Simple Things website too. And if, like me, you enjoy a good magazine, I have further good news... They are releasing a magazine on the 6th September 2012. I have already subscribed! You can also follow them on Facebook, Twitter and Pinterest.

I'll be sure to 'share the love' as I come across other things that you lovely readers may find interesting. I'd love to receive your recommendations too.

Much love x


Wednesday 15 August 2012

Make a String-Holder Cat


I wrote the draft for this blog in the garden - How lovely!!


This is my favourite make yet! The String-Holder Cat is very cute and looks very 70's, which it should, as the 'Something to Make' book was published in 1971.

This 'make' involves sewing. I am not the greatest seamstress but it goes to show that if I can manage to make this, then anyone can! I do love using felt... it's cheap, easy to use, doesn't fray (so no need to hem) and it comes in vibrant colours.

String-Holder Cat
Even though there are many steps to making this, it is very simple. Kids will love choosing what colour felt to use for the different features. It is also a great way to introduce children to sewing. All it needs is a simple stitch to keep the front and back together. If you are more experienced with a needle you can choose to sew a blanket stitch, which gives a nice finish. 

Time taken for us to make: 1 hour 

Cost to me: Nothing. We had all of the materials already at home from making things in the past. 

Original Instructions...
-


What we used: 

  • Felt in different colours
  • A small bowl (you could use a plate)
  • A needle and embroidery thread
  • A small coin 
  • Scissors
  • Glue
  • Pen
  • Small length of ribbon 
  • A ball of string 

What we did: 

We placed the bowl upside down on the felt and drew around it. We then cut it out and another exactly the same. A small hole was needed in one (for the cats mouth) and a slit was cut into the other. 

Draw round a bowl
Cut out the circle & another


Cut a hole for the cat's mouth
Cut a slit in the back piece
Using the different coloured felt we cut out a nose, using the coin as a template for a circle. Along with some bright yellow feline eyes. We fixed the eyes & nose with PVA glue (no sewing required).We chose to sew whiskers, but the instructions did say to use four broom bristle, simply pushed through the fabric. I was worried that they would fall out easily.  

Draw, cut out and fix the features
Sew whiskers


Sock puppet 'Simon' leant a hand (pun intended!). 

The ears were cut out of felt and glued to the inside of the circle needed for the back, along with a loop of ribbon placed between the ears.

Glue the ears to the 'Back' circle 
Glue the ribbon loop between the ears

All that was left to do was oversew the two circles together neatly all the way round taking care to leave the ears and loop sticking out.

Complete 'Back' circle 
Complete 'Front'Circle 
Oversew the two circles together


The ball of string was placed into the holder via the slit in the back and the end is pulled through the hole in the front.  

Place string through the back... 
and bring the string out through the mouth

And there you have it, a String-Holder Cat. Amelie LOVES it and it's now hanging proudly in her bedroom.


Remember, we'd love to see your 'makes'. You can send them to us via our Facebook group or Twitter.


Friday 10 August 2012

Make a Sock Puppet

This 'Make' is so easy and takes no time to do, but it can give you hours of fun playing with them!


Playing with puppets can really get a child's imagination going. They love communicating with these funny little creatures by either speaking to them directly or speaking as the puppet.

Time taken for us to make it: 10 mins

Cost to me: No cost

Original 'Make a Sock Puppet' instructions
 What we used: 

  • 2 x Children's socks (you can use adult socks but they can be too bulky for children's hands)
  • Coloured felt tip pens 

What we did: 

To create the face of our sock puppets we pulled the socks onto our left hand and tucked the toes of the sock into our fist. With a felt tip pen we drew a face. The eyes were placed on the knuckles and lips where the sock folds into the fist. 

Grab a sock

Tuck the sock toes into your fist

Draw a face onto the sock using a felt tip pen

Meet Sebastian...
and Simon!


There you have it! Sock puppets... so easy!! Of course you could use buttons for eyes, add wool hair, even bows or earrings. You can spend as much time and care over it as you like. We kept it simple as that is what the original instructions stated, but we may make more elaborate ones in the future. 

Amelie loved making these because of their simplicity. She loves playing with them even more. 'Simon' became a firm friend very quickly. She introduced him to her toys, played 'Pirates' with him and he even had his own plate at lunch!


Remember, If you have made anything from this blog, we'd love to see you pictures. You can get them to us via Facebook or Twitter.